

What is JWT
JSON Web Token (JWT) is a widely used standard for securely transmitting information between parties. It is commonly used to transmit information that can be verified and trusted, because it is digitally signed.
JWTs consist of three parts: a header, a payload, and a signature. The header typically consists of two parts: the type of the token, which is JWT, and the signing algorithm being used, such as HMAC SHA256 or RSA. The payload contains the claims. Claims are statements about an entity (typically, the user) and additional data. There are three types of claims: registered, public, and private claims. The signature is used to verify that the sender of the JWT is who it says it is and to ensure that the message wasn’t changed along the way.
To create a JWT, you first need to create the header and payload, which are then encoded using base64url encoding. The resulting two strings are then concatenated, separated by a period (.). The final step is to create the signature by signing the concatenated string using the algorithm specified in the header.
When a JWT is received, it can be decoded and the signature can be verified to ensure that it was not tampered with. If the signature is valid, the claims in the payload can be trusted and used to grant access or perform other actions.
JWTs are commonly used for authentication and authorization purposes, because they allow the server to verify the identity of the client and grant access to protected resources. They are also used for securely transmitting information between parties, such as when exchanging information between microservices
Protecting APIs using JWT
Here are some general steps you can follow to protect APIs using JSON Web Tokens (JWTs):
- Set up an authentication server:
The first step is to set up an authentication server that is responsible for issuing and validating JWTs. This server should have a secure database to store user credentials and a way to authenticate users, such as by using username and password or by using third-party authentication providers like Google or Facebook.
- Implement the login flow:
To authenticate users, you need to implement a login flow that allows users to provide their credentials and receive a JWT in return. This typically involves sending a request to the authentication server with the user’s credentials, and receiving a JWT in the response if the credentials are valid.
- Secure your APIs:
Once you have an authentication server set up and a login flow implemented, you can secure your APIs by requiring that clients provide a valid JWT in order to access them. This can be done by implementing a middleware or interceptor that checks for the presence of a JWT in the request header and verifies its signature and claims before allowing the request to proceed.
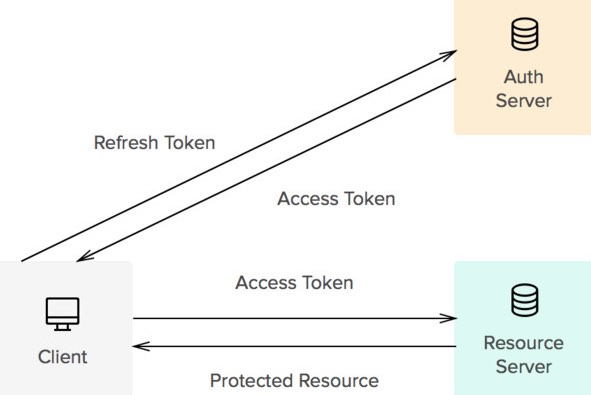
- Refresh JWTs:
JWTs have a limited lifespan, and will expire after a certain period of time. To ensure that users don’t have to constantly log in, you can implement a refresh flow that allows users to request a new JWT when their current one expires. This can be done by sending a request to the authentication server with the expired JWT, and receiving a new JWT in the response.
By following these steps, you can use JWTs to secure your APIs and protect them from unauthorized access. It is important to keep in mind that JWTs are just one aspect of API security, and you should also consider implementing other measures such as input validation and rate limiting to ensure the security of your APIs.
GoLang Code to implement JWT based Authentication
| |
Creating a protected handler that can only be accessed with a valid JWT
| |
This protected handler first gets the JWT from the ‘Authorization’ header of the request. It then parses the JWT and verifies that it is valid. If the JWT is valid, the handler extracts the claims from the JWT and uses them to do something, for example, getting the username from the claims. If the JWT is invalid or there is any error during the parsing or verification process, the handler returns an error to the client.
Here are a few things to consider when building an authentication server:
Security: Make sure to use secure methods for storing and transmitting passwords, such as hashing and salting. Use secure communication channels, such as HTTPS, to prevent attackers from intercepting sensitive information.
Scalability: Consider the performance and scalability of your authentication server. Make sure that it can handle a large number of requests without breaking down.
API design: Design your API in a way that is easy to use and understand. Consider the use cases for your API and design it accordingly.
Error handling: Properly handle errors and return appropriate status codes and error messages to the client.
Documentation: Provide clear and comprehensive documentation for your API, including examples of how to use it and any relevant details about authentication and authorization.
Testing: Test your authentication server thoroughly to ensure that it is reliable and secure.
Updates and maintenance: Keep your authentication server up to date with the latest security patches and updates. Regularly monitor and maintain it to ensure that it continues to function as expected.
